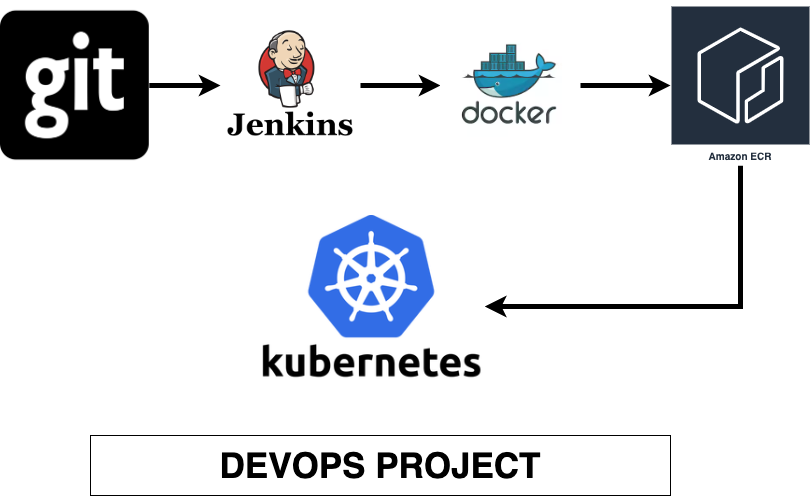
In today’s fast-paced software development world, automation through continuous integration (CI) and continuous deployment (CD) pipelines is essential for delivering high-quality applications quickly and efficiently. In this blog, we’ll walk through the process of setting up a DevOps pipeline using GitHub, Jenkins, Docker, Amazon ECR (Elastic Container Registry), and Kubernetes.
The goal of this tutorial is to automate the process of building Docker images, pushing them to Amazon ECR, and deploying them to Amazon EKS (Elastic Kubernetes Service).
Step 1: Setting Up Docker on Jenkins Server
To start, Docker must be installed on the Jenkins server because Docker will be responsible for building and managing application containers.
- Install Docker on your Jenkins server (Amazon Linux 2).
- Start Docker and ensure it runs automatically when the server reboots.
- Verify Docker is installed and running properly.
- Optionally, add the Jenkins user to the Docker group, allowing Jenkins to run Docker commands without needing elevated privileges.
Step 2: Creating the Jenkins Pipeline to Build and Push Docker Image to ECR
Next, we’ll set up a Jenkins pipeline to automate building the Docker image and pushing it to Amazon ECR.
- Create a new pipeline job in Jenkins.
- The pipeline will:
- Pull the latest code from GitHub.
- Build the Docker image.
- Log in to Amazon ECR for authentication.
- Push the Docker image to the ECR repository.
Step 3: Storing Docker Image Version in an Environment Variable
To make the pipeline more flexible, store the Docker image version in an environment variable. This will allow you to easily reference and update the image version later in the process.
- Set the version (e.g.,
v1) in an environment variable. - Print the version to confirm that it’s set correctly.
Step 4: Updating Docker Image Version in Kubernetes Deployment YAML
After the Docker image is built and pushed to Amazon ECR, we’ll update the Kubernetes deployment configuration to reference the new image version.
- Modify the Kubernetes deployment YAML file to dynamically use the version stored in the environment variable.
- Replace the image tag in the YAML file using the version.
Step 5: Creating EKS Cluster and Deploying the Application
Now that the Docker image is pushed to ECR, we need to deploy it to an Amazon EKS (Elastic Kubernetes Service) cluster.
- Create an EKS cluster through the AWS Management Console.
- Configure
kubectlon the Jenkins server to interact with the newly created EKS cluster. - Verify the cluster is accessible using
kubectl.
Step 6: Troubleshooting Node Issues in EKS
If your application isn’t running correctly, it could be because of insufficient resources in your EKS cluster.
- Check the node status to see if there are any issues.
- If needed, scale the EKS node group by adding more nodes to the cluster.
Step 7: Deploying the Application to EKS
Finally, we’ll deploy the application to EKS:
- Apply the Kubernetes deployment configuration to EKS using
kubectl. - Expose the deployment as a service to allow external access.
- Retrieve the service URL and open it in your browser to verify that the application is running correctly.
Conclusion
Congratulations! You’ve now successfully set up a CI/CD pipeline using Jenkins, Docker, ECR, and Kubernetes. Here’s a quick summary of what was accomplished:
- Docker was installed on Jenkins to build images.
- A GitHub repository was connected to Jenkins to automate the build process.
- Docker images were pushed to Amazon ECR.
- The application was deployed to Kubernetes using Amazon EKS.
With this end-to-end DevOps pipeline, your application is now automatically built, tested, and deployed with each change, ensuring a smooth and fast release process. Stay tuned for more blogs as we dive deeper into advanced DevOps topics!


